Friday 27 March 2015

Gulp............It's Time for Goldwork!

One of the reasons for starting this blog was so that I could chronicle my adventures with new needlework techniques.  Anyone that knows my stitching will tell you that I love adding bling and metallics to my work wherever I can.  Of course the ultimate needlework technique that embraces that to the max is goldwork and I've been dying to give it a try and now the time has come!

I've always been interested in different types of embroidery techniques and textile art in general.  I've done copious amounts of reading on the topic, but I can procrastinate no more!  I'd previously thought that goldwork would be a technique that I would have to admire rather than try for myself as I felt it was something that would benefit from being demonstrated in class rather than self taught from a book.  Whilst I would love to attend an RSN day class, the distance is just too far for me, so I figured I would just put the idea to bed. 

Until that is a stitchy friend pointed me in the direction of Sarah Homfray, who currently teaches for the RSN as well as running her own private needlework classes.  Sarah has a beginner's goldwork kit where the instructions are delivered entirely by YouTube videos which was just perfect for me and exactly what I was looking for.  So here are my goldwork supplies for my much anticipated new start:

Goldwork Kit and supplies
 
 
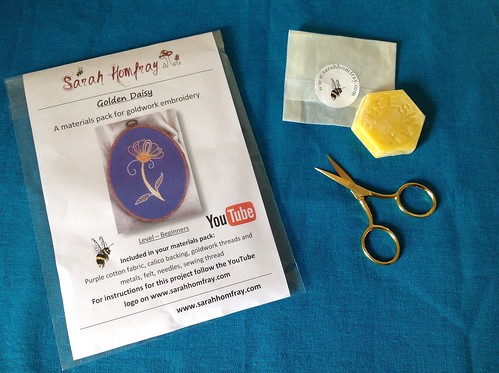
My kit, plus two other essential pieces of goldwork equipment: beeswax and a pair of goldwork scissors.  Goldwork scissors differ from ordinary embroidery scissors as they have one serrated blade which helps prevent the threads from slipping when you are cutting them.
 
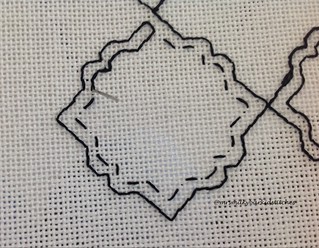
So what's in the pack?  First of all there is the design, which is helpfully already transferred onto the cotton fabric for you and also includes a piece of calico backing to give added strength to your finished piece:
 

Goldwork design
 
Also included are all the other wires, threads, felt and needles you need to complete the design:
 
Kit contents

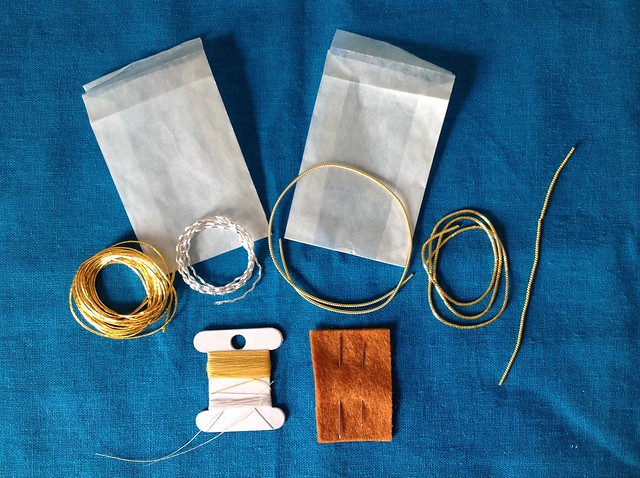
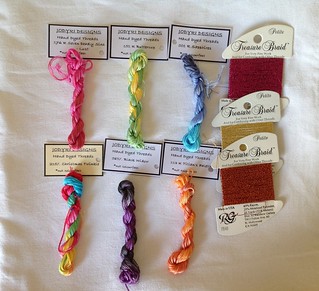
The types of goldwork thread used in the design (from left to right) are: Japanese thread, Rococco thread, Pearl Purl, Bright-check Purl and Wire-check Purl.

I am going to try very hard to slow down and pace myself when working on this design and channel the Slow Stitching Movement!  I won't share my progress stage by stage, but will probably do a big reveal once it's complete - no pressure that way!  If goldwork turns out to be something that I enjoy, the cost of materials makes it something that I would not be able to have on the go all the time, so I want to savour my stitching!  I have a terrible habit of "gobbling up" the projects that I'm really excited about.  I speak as a stitcher that finished the majority of her first large Chatelaine mandala (Chinese Garden) in 6 weeks!

On the other hand of course, I might be a complete failure at it and this may be my first and last post on goldwork - the point of the blog though is to keep me honest and accountable, so if I haven't mentioned this project in a while feel free to nudge me about it!

If you are interested in this techinique, obviously the stitching oracle Mary Corbet has written a plethora of articles on the topic.  I'm also a huge fan of Sophie Long's work (@sophieembroidery on IG) and love her most recent video using Pearl Purl and silk ribbons together.  There are so many talented artists out there, I'm just glad they share their work as I find it so inspiring!

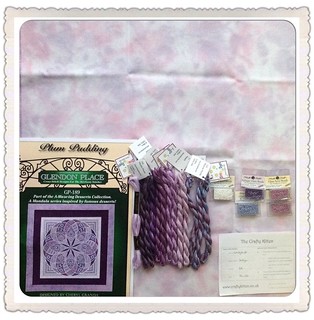
So they'll be lots of couching of thread going on hopefully over the weekend and then I get to pick up Plum Pudding on 1st April to continue my SAL with Nic!  I'll be back before then though with an Operation Threadporn update and to see how March's stitching goals went.......

Happy Stitching!

Monday 16 March 2015

Hardanger - Don't Fear the Squissors!

It might come as a surprise to you, but I actually hate starting new stitching projects.  Don't get me wrong, I like picking a pattern, kitting it up, cutting fabric and the eventual stitching of it - but I hate staring at that blank piece of fabric all ready to stitch on in the frame.  I start to doubt myself: is the fabric the right way around, is my starting point really 3 inches in from the edge/in the exact centre of the fabric, are my thread choices the right ones?  I hate those initial first stitches and it's why I dither over new starts.  I've had two projects buzzing around my brain so I just decided to start them on the same day and get the worst over with!  One was Box of Delights and the other was A Confetti of Hardanger by Bee's Needleworks.

I've had Confetti of Hardanger in my stash since 2012, when it was offered as a group SAL as part of the Stitch Specialists Yahoo Group, a group run by the designer of this chart, Abi Gurden.  I've wanted to stitch this chart since then, but actually waiting this long proved fortuitous as the perles I've chosen to use for it didn't exist then, but they do now!  The perles I'm using are hand dyed by Jodyri Designs and Michelle is one of the few dyers I know to hand dye matching perles in #5, #8 and #12.  I'll be using Jodyri's beautiful Alaskan Beauty perles for this one, along with possibly some complimentary DMC solid perles and white, the mainstay of Hardanger stitched on 25ct white lugana:

Confetti of Hardanger Materials
 
The pdf chart comes with very detailed instructions for each of the 14 parts, so even if Hardanger is new to you, everything you need to know is included.  There are a few filling stitches in this one that are new to me, so I'm looking forward to adding them to my list!
 
Here is Part 1, Klosters and Extended Klosters stitched in #5 perle in Alaskan Beauty:
 
 
Confetti of Hardanger - Part 1
 
Here is Part 2, Cable Stitch and Doubled Back Stitch stitched in #8 white perle:
 
 
Confetti of Hardanger Part 2
 
White on white is a bit hard to see so here are a few close-ups, Cable Stitch:
 
Confetti of Hardanger - Cable Stitch
 
 
And Doubled Back Stitch, which was the first time I'd ever worked a stitch from the reverse of the fabric!
 

Confetti of Hardanger - Doubled Back Stitch
 
The hardcore Hardanger (aka cutting) doesn't begin until Part 6, so I still have a few parts to go before squissor fear sets in!
 
I've also had my stash for the month arrive, my monthly thread and fabric from Jodyri Designs as well as a fantastic book, The A-Z of Whitework:
 
March Stash
 
I've never been a fan of generic stitch dictionaries, I much prefer books on specific techniques and the stitches and facts relevant to them individually.  I was so pleased when I discovered that the A-Z series was being reprinted again as Search Press had bought the rights to them.  I didn't want to pay up to four times the price for an OOP copy!  They are a brilliant series of books and I think, along with the RSN guides, tell you everything you need to know about individual embroidery techniques.  Mary Corbet has fantastic reviews of these titles on her blog, so no need for me to go into detail.  I've got the A-Z of Goldwork on order too, which hopefully should be arriving in May.
 
Last but not least, it's about time I got on with my Operation Threadporn projects after two new starts, so here are my proposed thread choices for my projects, the finishes to be revealed at the end of the month, (yet more Wildflowers, Mo's Silks and Silk Mill silk):


Happy Stitching!
 

Friday 13 March 2015

A Forgotten New Start

It didn't take long for me to deviate from my March plans!  In all fairness I had forgotten about this particular pattern which is going to make sure that my Operation Threadporn totals look pretty healthy this month!

The project in question is Box of Delights by Liz Almond of Blackwork Journey.  I'm pretty sure that hundreds of stitchers have stitched her Save the Stitches piece and now Liz has released another beautiful design that is FREE - how is a threadhead to resist!  I had collected all the parts to Save the Stitches (I must have Obsessive Collecting Disorder) despite the fact that I knew it was probably not something that I would stitch.  Box of Delights however appealed on so many levels, not least of which was the opportunity to use 36 different hand dyed threads!


I love blackwork, I love the history of blackwork and the thought that centuries ago Tudor women were creating such intricate and detailed costume embroidery by candlelight.  However, loving colour as I do, it also pleases me that blackwork doesn't have to be black.  While we're at it, goldwork doesn't have to be gold either, but whitework is ALWAYS white - otherwise it's just embroidery :).

Now for the thread choices, 36 of them to be exact.  I decided to stitch this in cotton (this stitcher's constant dilemma cotton vs silk!) and to use my Jodyri Designs stash of threads.  I could have picked thread numbers at random, but that would never have worked for this little control freak!  Instead I tried to ensure that each of the six colour groups were evenly represented and here is the result:

Total Thread Choices for Box of Delights
 
This selection is subject to change and one thread has already been swapped for another as whilst it was gorgeous on the skein it was too pale when using just one strand on 28ct White Brittney.
 
Here are my colour selections for the first block in the order in which they were stitched:
Thread Choices for Block 1
Top L-R Lust, Buttercup, Sapphires
Bottom L-R Christmas Twinkle, Black Widow, Titan's Palette
Metallics in PB03, PB24, PB48
 
Before the reveal though, I thought I would just mention how I choose to stitch blackwork.  Where I can, I like to use Holbein Stitch (or Double Running Stitch as it is also known).  It is a traditional blackwork stitch that results in your work being reversible (if you are a genius embroiderer!).  I'm not fussed about my work being reversible, but I like that the stitch results in a neat back, is very thread frugal and cuts down on stitching time.  Using this stitch basically means you stitch a running stitch (every other stitch on your pattern), then reverse your direction and stitch back to your starting point, filling in the "missing" stitches:
Holbein Stitch Front
Holbein Stitch - Front of work
Holbein Stitch Back
Holbein Stitch - Back of work
I used Holbein stitch for all the black stitching as when you use overdyed threads with this stitch, it messes up the colour transitions - but if that is the look you like of course you can use it!

Here is the final result with Block 1 complete:

Box of Delights Block 1 of 6 complete
 
Yes I am a crazy person using the metallic for French knots!  This was a joy to stitch and I am eagerly anticipating the release of the next block.  In the meantime I may well find myself completing the border and outlines if I get the urge for some hypnotic blackwork stitching!
 
I've also started another project - but that is another post for another day!
 
Happy Stitching!

Sunday 8 March 2015

Plum Pudding by Glendon Place - March Progress

I was very excited to make a long awaited start on Plum Pudding by Glendon Place.  Nic and I decided to unite over our shared love of purple and SAL on this one together as it has been on both our wishlists for so long!  We settled on stitching on it for the first week in each month which makes it easy to remember :).

Here are the materials - as it happens both Nic and I are using the same fabric, 28ct Jazlyn in Candytuft by the Crafty Kitten and gorgeous Dinky Dyes silks:

Materials for Plum Pudding
 
 
I love love love stitching with Dinky Dyes silks!  Granted I know I say this about most silks, but you may be surprised to find some brands conspicuous by their absence in my stash as I'm not a fan of them!  I think Dinky Dyes silks are an excellent place to start for stitchers that are new to silks.  They are the least expensive of the branded silks, come in gorgeous colours but are also easy to substitute in designs as the skein lengths are the same as DMC.  A lot of silks come in 12 stranded 6 yard skeins or 7 stranded 5 metre skeins but Dinky Dyes come in 6 stranded 8 metre skeins just like DMC.  So if you have a monochromatic design that you want to make more exciting, you will need exactly the same amount of skeins in Dinky Dyes silks as the pattern calls for in DMC - no thread maths required!
 
Anyway, here is my progress for the week.  I only managed three stitchy sessions on this one but am happy that I have completed the centre of the mandala:
 

Plum Pudding - WIP 1
 
It was hard to put down, but I will look forward to picking it up next month!  Next up to stitch will be my Operation Threadporn projects for the month once I've settled on thread choices - I swear that choosing threads is the most difficult part of this whole challenge !
 
Happy Stitching!

Tuesday 3 March 2015

February Thread Challenge Report

I really thought that February was going to be a bit of a bust for this challenge as I had welcomed quite a few new threads into my stash, so I was expecting to see my percentage of threads used go down instead of up!  My sister was crafty in introducing the percentage rule for this challenge that's for sure (see the tab at the top for more info on the rules for this little adventure) as I now find myself questioning how many new (unnecessary) hand dyed threads I want to keep adding to my stash this year!

Here are my Operation Threadporn specific projects for February, firstly my February Hardanger square as part of Mabel Figworthy's SOTW SAL:

Mabel Figworthy's February SOTW SAL
 
I used Caron Watercolours from my hand dyed stash for this one.  I think if I was told I could only use one brand of thread for the rest of my stitching life it would be Caron.  That way I would always have a supply of solid and variegated cottons and silks and some lovely metallics too!
 
The speciality stitch (I hate that phrase as it makes them sound like only especially gifted people can stitch them, which is rubbish - anyone can stitch them should they so desire!) used in this one is beaded edging (without the beads!).  It falls into the category of what I call "looped stitches", which are my least favourite.  They can be so difficult to stitch uniformly, they rely on you having perfect tension as most of the work is done on the front of the fabric and not via the holes!  Doves' eyes used to be my Hardanger nemesis for this same reason, but practice helps - they still aren't perfect :).
 
My freebie project for this month was one I had wanted to stitch for such a long time and it certainly proved to be worth the wait and lived up to my expectations!  It is from Olga Maxden's blog, whilst the blog is in Russian I think the language of stitching is pretty universal.  There are some phenomenal designs on this blog, if you love speciality stitches like me you will definitely want to check it out!  The design I chose for February was called Tree of Hope and I finished it into a cushion:
 

Tree of Hope by Olga Maxden
 
I must have been having a Caron fix this month as I used Caron Wildflowers (and a Threadworx stranded cotton) this time for this design.  I like using thicker threads for speciality stitches as it means you can get away with using a single strand for a fuller stitch, rather then wrestling with 2 or 3 strands of regular six stranded cotton and getting them to behave nicely with a laying tool (or a #22 tapestry needle in my case).  I love the way the spider web rose stitches turned out and I was also pleased with myself that I remembered I had some flower sequins in my paper crafting stash, so those got put to good use too.
 
This meant that the percentage of my hand dyed thread stash that I have used to date is now.........2.09%, so heading in the right direction, despite the fact I ended up adding quite a bit to my thread stash this month!  I'm not focusing too much on the numbers, the fact that I am using my stash is satisfaction enough, but the numbers help in motivating me to use it and not buy more threads!
 
I'm also keeping a running total of the number of different stitches I'm using in my pieces and so far that adds up to 16 different stitches over the past two months, so that makes me happy too.
 
I'd better get on with Plum Pudding otherwise Nic is going to be stitching circles around me!
 
Happy stitching!

Monday 2 March 2015

March Plans and a Finish!

I like to set stitching "goals" at the start of each month, that way I can tailor them to my particular stitching tastes at the time, as well as making them achievable for that particular month if I know I will have less stitching time.  Past experience has taught me that yearly goals don't work for me, as soon as I say x/y/z has to be done by such and such a date, I instantly loose the desire to stitch on that piece :).

I'm trying to have a more laid back approach to my stitching this year, so if things on this list don't get done, it's no big deal - I just like lists!

March Plans
  • Start and stitch on Plum Pudding by Glendon Place from 1st -7th March as part of my SAL with Nic
  • Start a project using a technique that is new to me (very excited about this!)
  • Stitch and finish my March freebie project for Operation Threadporn, something from La Comtesse
  • Stitch the March Hardanger square from Songs of the Weather SAL by Mabel Figworthy
Those are the priorities, if they are done than one or more of the following could be started:
So we'll see how that goes.......

Today saw the release of the final part of Les Dentelles SAL, as I was home today I made sure I had everything ready to go last night so that I could stitch and finish the piece today:

Les Dentelles Complete
Hard to get a good photo with neutral on neutral tones!

I really enjoyed stitching this piece and I love the way my colour combination turned out.  Esther's designs are beautiful, so if you are a fan of blackwork and enjoy choosing your own colours I would definitely recommend her Etsy Shop!
 
Hopefully my next post will be an Operation Threadporn report for February..........
 
Happy Stitching!